
FAQ
We've pretty much summarize all the questions you may have about our products.
If you don't find your answer here, or just prefer to talk to us, please reach to us through email at any time and we'd be happy to help!
General Questions
When you order a Paper Shoot camera, you’re all set from day one. You’ll get:
- Your chosen camera + case
- 2 rechargeable AAA batteries - 20MP version only
- A 64GB SD card (aka thousands of memories ready to happen) - 20MP version only
- A USB-C to USB-C charging and transfer cable
There’s no power button. Just press the shutter and start shooting! The first shot may take a few seconds (wake-up time), but once it’s on, the next ones are quicker.
Not built-in. But we’ve got a cute detachable ring light you can add on. It works with any Paper Shoot camera, so you can light up your photos in style.
You can take around 200–300 photos. That’s plenty of memories before you’ll need to recharge.
You can find a tutorial on how to synchronize the photo date by following the links below:
For Mac: https://papershoot.eu/pages/time-sync-for-mac
For Windows: https://papershoot.eu/pages/time-sync-windows
The date offset occurs because your Paper Shoot does not have an internal battery to keep track of the date.
By following the steps in the tutorial, you can synchronize the current date. After that, simply recharge your Paper Shoot within 24 hours when the battery runs out to keep the correct date.
- 20MP CMOS Image Resolution
- Sensor: 1/3"
- 28 mm Focus
- Aperture : F2.2
- ISO 100-3200
- Max shutter time: 1/30"
- One-Button System (On/Off/Shoot)
- Automatic image algorithms
- 1440p 10 seconds video clip (w/ and w/o power bank)
- Video and time-lapse format: MP4
- Four color effects/Time lapse/10 seconds video
- Requires and supports SD card below 128 GB and Wifi SD card (included)
- Requires 2 x AAA rechargeable batteries (included)
- Picture format: JPG
- DIY Assembly
Download the User manual by clicking the link below:
👉 🇬🇧 English User Manual
👉 🇫🇷 French User Manual
👉 🇩🇪 German User Manual
SD card
There are a few different ways to see your photos!
📸 On computer or tablet
You can access directly to your SD card on your computer or tablet via 2 options :
1. Just connect your Paper Shoot to your computer or tablet using the USB cable. It means you don't need to remove the SD card to be able to read it for more simplicity.
2. You can also remove the SD card and insert it directly in your computer to browse the pictures.
📱 On your phone
Want your photos on the go? Grab an SD card reader. We have them right [here].
📶 Go wireless
Feeling fancy? A WiFi SD card lets you see your photos without any cables at all.
Thousands. Thanks to the 64GO SD card included, you’ll be snapping away for ages before you even think about emptying it.
No worries, it’s easier than it sounds! Just a few clicks and you’re ready to shoot. Here’s how:
💻 On Mac
Pop your Micro SD card into the adapter (make sure it’s unlocked).
Open Disk Utility.
Select your SD card and hit Erase.
Choose MS-DOS (FAT32) as the format.
Confirm and you're good to go.
🖥️ On Windows
Right-click on your SD card.
Choose Format.
Select FAT32 (Default).
Hit OK and your card is good as new.
⚠️ Heads up: formatting erases everything on your card, so save any photos first.
Rechargeable batteries
Easy! No need to remove the rechargeable batteries. Just plug the included cable into your camera, connect it to a power bank or wall plug. After 2 or 3 hours, you’re good to go.
Green LED on = charging
Light off = fully charged
Bonus: our cameras stop charging automatically when full, so you don’t have to babysit them. If you prefer charging batteries outside the camera, make sure your charger also stops automatically once they’re full.
The rechargeable batteries included with your Paper Shoot have a thin protective plastic film. Please make sure to remove it before use, as it can prevent proper charging and cause the camera to malfunction.
Your Paper Shoot needs rechargeable AAA batteries to work at its best as normal batteries might not give enough energy to your Paper Shoot to work properly. Regular ones die fast and can’t be recharged, which means less power and more waste.
Be aware that if you use normal batteries as a one time exception, you absolutely can NOT recharge your Paper Shoot.
One charge usually lasts 200–300 shots. The included rechargeable batteries can be recharged hundreds of times (depends on how much you’re shooting).
If you notice your camera losing power quickly or the right blue LED keeps flashing even after charging, it might be time to swap them out. Rechargeable AAA batteries last a long time, but not forever.
Pro tip: use good quality rechargeable AAAs for best results.We specifically recommend brands like Energizer or Eneloop (or even Bonai or GPT).
Build-in Filters
Every Paper Shoot comes with 4 classic built-in filters (Color, Black & White, Sepia, and Blue Tone). Just flick the little switch and you’re set.
Extra filter cards = extra fun
The filter and function cards are optional add-ons to be purchased separately. They give you more vibes, more effects, and new ways to play with your photos beyond the 4 filters you already have.
They come as little sim cards to be inserted in your Paper Shoot. You can find more info on them in the Filter/Function Cards section of our FAQ.
Think of it this way:
Built-in filters = your everyday essentials.
Filter cards = the bonus pack to mix things up.
Easy! Just flip the tiny switch on your camera before you snap your photo. You can swap between filters as much as you like, no rules here.
From left to right on the switch:
🌈 Color
⚫ Black & White
🧡 Sepia
💙 Blue Tone
Filter/Function Cards
On your Paper Shoot board, you’ll see a small SIM-card-style slot. That’s where the magic happens. Slide your filter or function card in, and every photo you take will instantly have that effect.
Super simple. Just pop the card out and swap it for another one. One slot = one card at a time, but you can combine them with the built-in filters for endless looks.
Sadly no. There’s only one slot in your Paper Shooot. But don’t worry: you can still combine a function card with the built-in filters.
Videos
Not only you can film using your Paper Shoot, you can even take super cool timelapse video as well.
How ? It's super simple:
- Plug your Paper Shoot into a power bank
- Switch to the 3rd filter + press the shutter = 10s video
- Switch to the 4th filter + press the shutter = timelapse
Want to skip the power bank? Grab a recording function card and you’re set.
Understand and take care of your Paper Shoot
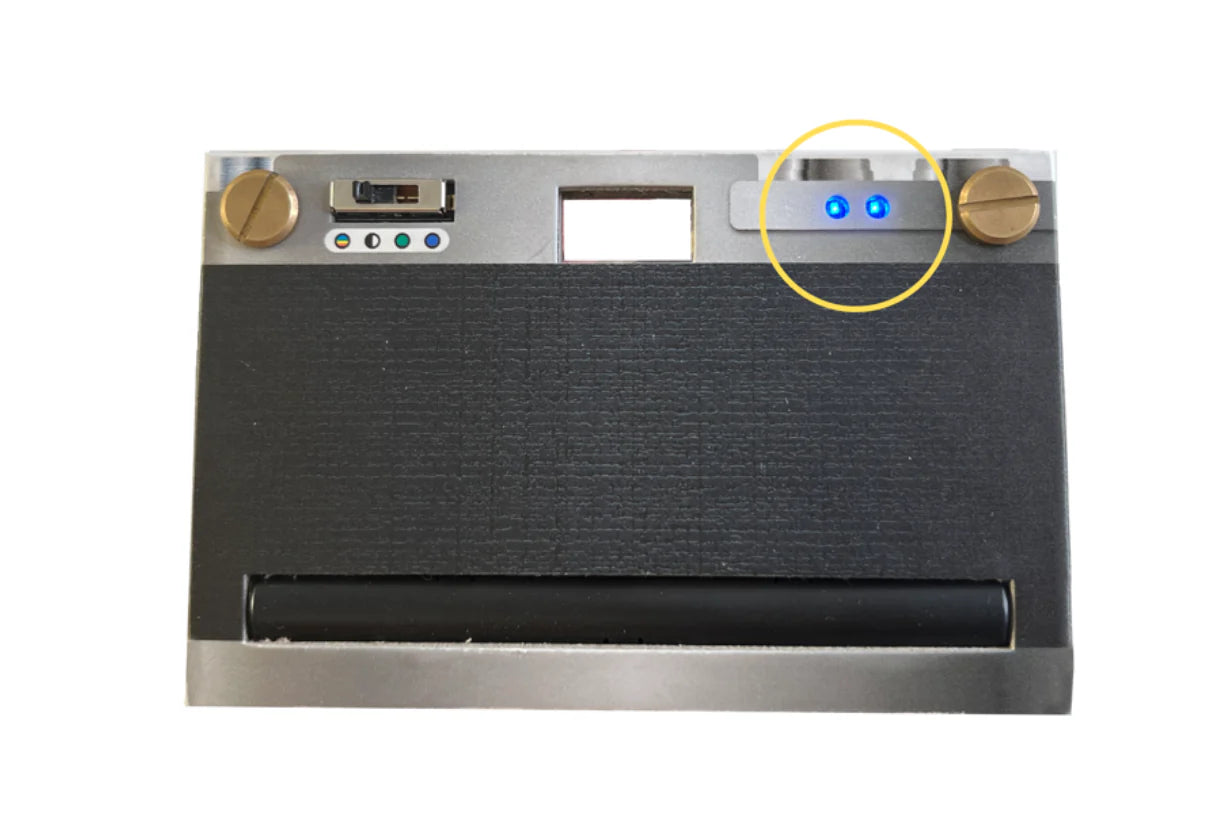
Don’t panic! 99% of problems are related to either the SD card or the batteries. If one or both LEDs are flashing and you hear an error sound, don't worry, it means that the device is working and the problem should easily be fixable. Here's how to identify the source of the problem using the indicators.
Left LED: SD card issue. Make sure it has space left, and is clicked in properly. Also check that the SD card is not locked and the format is compatible with your Paper Shoot (WINDOWS – FAT32 / MAC OS – MS-DOS FAT32).
Right LED: Battery issue. Use rechargeable AAA batteries and check they’re fully charged. If it happens after a while of using your Paper Shoot, it might be time to replace the batteries.
Both LEDs: Also a battery issue. Recharge your AAAs and try again. When you purchase new batteries be sure to check the brand, that they are AAA rechargeables and always charge them before using even if brand new.
We recommend to clean your lens from time to time to avoid any dust.
👓 How to clean it
Use an air blower tool (the same kind you’d use for a phone or camera). A quick puff of air keeps your lens spotless without scratching it.
🚫 What not to do
Skip the cloth! Wiping can leave tiny scratches on the lens, and nobody wants that.
Your Paper Shoot is not waterproof. It can handle a rainy or snowy day but should never be submerged in water.

Recording Retro Hand Crank Plug
This named triggered your curiosity? Have a look at it on our accessories page!
SD Card Socket
Insert 128GB (or below) SD card or here to save all your memories!
Filters Switch
- Color
- Black & White
- Sepia
- Blue Tone
Function / Filter Card Socket
This is where the extra magic happens! Insert a function card or a filter card to apply its effect to all your pics!
LED Indicator
- Right Led: Battery Indicator
- Left Led: Memory Card Indicator
Charge the batteries
If the right or both lights are flashing, this usually indicates a battery issue.
Please make sure the batteries are high-quality AAA rechargeable batteries and that they are fully charged.
We recommend energizer rechargeable batteries for your Paper Shoot.
Did not find the answer you were looking for? Prefer to talk to us directly? We'd be happy to help out and answer all your questions!
Reach out to our team at hello@papershoot.fr